|
|
|
|
1.
|
Create a new file by selecting New from the File menu bar. Select Movie from the Modify menu. This allows you to define some of the attributes for your movie, such as window size, 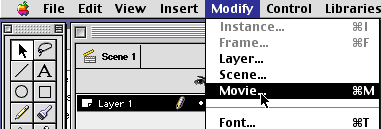 background color, and frame rate. Set the width to 550 pixels and the height to 400 pixels. The blank rectangle at the bottom of the screen is called the Stage. This is where you draw or place graphics and preview the movie as you build it. background color, and frame rate. Set the width to 550 pixels and the height to 400 pixels. The blank rectangle at the bottom of the screen is called the Stage. This is where you draw or place graphics and preview the movie as you build it.
|
|
|
|
2.
|
|
The area above the Stage is the Timeline. Similar to a storyboard, the Timeline acts as a musical score to the Flash movie. It represents the different elements and actions that appear over time, together or separately. Use the Timeline to show images, make the animations, and define interactivity. You can detach the Timeline by clicking and dragging it outside of the document window.
|
|
|
|
3.
|
The small arrow at the top of the time indicates the frame that you're currently working with on the Stage. You can add elements to your Flash movie by creating new layers in the left column. You can also extend the duration of the movie by adding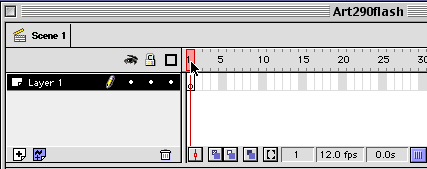 frames to the right end of the Timeline. At any time, you can add frames or layers to the Timeline, move them, or change their attributes. The frames with the solid blue dots, called Keyframes, are where all the changes occur. frames to the right end of the Timeline. At any time, you can add frames or layers to the Timeline, move them, or change their attributes. The frames with the solid blue dots, called Keyframes, are where all the changes occur.
|
|
|
|
4.
|
 |
Although you don't have to draw anything in Flash (You can use Freehand), it is sometimes more convenient to do so.
- Start by selecting View, then Work Area. You'll now be able to draw past the edge of the movie area.
- Using the various tools in the the Toolbar palettet draw a series of objects on the screen
- Create two different layers and place your objects that you want to behave independently on those layers.
- To add another layer, select Insert, then Layer.
- Double-click on each layer you create and name them "Button 1" and "Button 2".
Notice the the tool modifiers. They are contextual, so they change according to what tool you've selected from above.
- Make two graphics, on two layers, that you will use as buttons and make another object on another layer that we will animate .
- Save your movie.
|
|
|
5.
|
Look at the Timeline for your movie. Double-click on the field that contains the Button 1 and rename it Animation1. To give the object space to move, double-click it and drag the entire shape to the left side of the Stage.
Click on the solid dot, which signifies a Keyframe, drag it across to frame 30,and release the mouse button. The Frame Indicator can now move within those 30 frames, but nothing changes in the Stage area because all the frames except the last are blank. Click on the solid dot in frame 30 of the timeline and move it back to frame 1. This will put your object in all of the frames. In Flash, a blank frame follows whatever is defined in the Keyframe before it.
Select frame 5. Choose Insert, then Keyframe. The Stage area should remain the same, but now another dot appears in the Timeline. Hit Enter on your keyboard to play the movie. Since both Keyframes are the same, nothing really happens, aside from the slider moving across theTimeline. To make something happen, click on the second Keyframe and then drag your object to a different location. Hit the Enter key again. What you see is animation: the object moving from one location to another.
|
|
6.
|
Tweening
To make the animation smoother you must make your object a symbol. Symbols are used to make almost every Flash animation (except shape morphing) work, and they keep Flash movies small. Making our object into a symbols allows us to use it throughout our movie without having it take up additional space. Once an object is turned into a symbol is becomes part of your Flash project library and can be used over and over again.
Choose Window and then Library to open the Library palette for this movie. Right now it's blank. Click on the first frame in the Timeline and then select the object. Choose Insert, then Convert to Symbol. When the dialog box pops up, name the new symbol "Animation" and select Graphic as its behavior. You can now see it in the Library palette, and you can place it into your movie wherever you like.
|
|
7.
|
Tweening palette
Click on the fifth frame or the second Keyframe. Your object will still be there. Delete it, Then select the Animation on the Library palette. Drag the preview of the symbol into the Stage area to a location close to the object you just deleted. Now select any frame between the two Keyframes. Choose Modify, then Frame, and a window with several tabs
pops up. Select the Tweening tab. From the first pulldown, select Motion. Leave everything else at its default setting and click OK. You'll notice an arrow in the Timeline that indicates the tweening.
|
|
8.
|
Layering and fading
Insert a Keyframe in frame number 3 of the Button 1 layer. Select the object in the "Button 1" layer. Reset the movie to the first frame and hit the Enter key to see the circle pop up suddenly in frame 3. Convert "Button 1" to a symbol (choose Convert to Symbol from the Insert menu). Name this symbol Button 1. Insert a Keyframe at frame 10 of the Circle layer. Remember, the contents of any new Keyframe are inherited from the previous Keyframe until you specifically alter it, so you should only add a Keyframe when you want to make a change to a symbol or object. Not only does this keep the Timeline neat, it conserves file size on the final movie.
|
|
9.
|
Click on "Button "1 select Modify and then Instance to apply an effect to this use of the symbol. Choose the Color Effect tab, select Alpha from the pulldown menu, and set the percentage to 0. After you click OK, the circle will seem to disappear. It's still there, but an alpha value of 0 makes symbols appear invisible. Click on any frame between 3 and 10 in the Button 1 layer. Select Modify and then Frame to get to the Tweening palette. Select the Motion tween and leave all the other settings as their default. As a rule, use the Motion tween for everything but shape morphing.
|
|
10
|
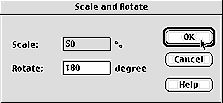 Make the object in the "Button 2" layer a symbol. Click on frame 15 in the "Button 2" layer and add a keyframe. Click on the Button 2 symbol in frame 15 (the second Keyframe) and select Modify, Transform, Scale, and Rotate. Enter 50 percent in scale and 180 degrees in rotate and click OK. Make the object in the "Button 2" layer a symbol. Click on frame 15 in the "Button 2" layer and add a keyframe. Click on the Button 2 symbol in frame 15 (the second Keyframe) and select Modify, Transform, Scale, and Rotate. Enter 50 percent in scale and 180 degrees in rotate and click OK.
Edit the tweening for the transition from frame 1. The shortcut for this maneuver is to double-click on any frame in the Timeline between frames 1 and 15. Select Clockwise from the Rotate pulldown menu and enter 1 in the Times field. Now play your movie again.
|
|
|
| |
Also, Flash animations don't have to move along a straight line; they can
take any path. With the Triangle layer active, choose Insert and then Motion
Guide. You'll notice this created a new guide layer (with a loop icon in it).
Click on the guide layer name to make it active if it isn't already. Make
frame 5 the current frame so you can see the triangle on the right side of
the Stage. Select the Pencil tool and the Smooth Modifier. Draw a loop
starting at the center of the triangle and bring it around the bottom and
back up the left side. Is it not smooth enough? Double-click on the path
(using the Arrow tool), and then click on the Smooth Modifier again and
again until you achieve the desired result.
Here's the Triangle layer and its Motion Path layer. The Pencil icon indicates
an active layer for editing in the Stage area. Right-click (control-click on Mac)
to reveal layer options.
Next, drag the triangle by the cross hairs into the center until it snaps to the
starting point of the path you just drew. If you are having trouble with this,
make sure that Snap under the View menu is activated. Add another
Keyframe to Frame 20 in the Triangle layer, and drag the triangle to the
opposite end of the path. Double-click on the triangle to edit the Instance
properties. Select Special from the Color Effect menu. Move the various
sliders around to change the color of the triangle. Click OK.
Activate motion tweening for frames 6 through 20 and set the rotation to
Clockwise twice. Play the movie to see what you've created. If the triangle
doesn't move along the path, be sure that the center of the triangle symbol
is snapped to the path in Keyframe 5 and Keyframe 20. Once everything is
working for you, click the first dot to the right of the Guide layer name
(under the eyeball) to hide it. Guide layers don't appear in the final movie,
but you may want to hide them while editing other layers. |
|
|
| |
You can stop there for now or you can go crazy creating more layers and
animating the same Triangle and Circle symbols any way you like with little
impact on the file size. If you saved this as a Shockwave movie right now,
its size would be less than 2 KB.
Experiment with adding more layers to your movie and combining tweening
actions. There are numerous ways to double up the effects. Once you're
comfy with those, try and make a Shape tween. Hint: This is the only
exception to using symbols. Shape tweening (also called shape morphing)
works only with ungrouped, nonsymbol objects, which exist directly on the
Stage and Timeline.
Also, try adding some text as an object or symbol. It's similar to
creating and editing other objects, but you use the text tool.
Here we're adding another triangle to the animation.
So far we've talked about creating images in Flash and animating them. But
don't forget that your creations have to engage users to be successful on
the Web — and you're not going to do that simply by making pretty pictures
dance. So in Lesson 2,s we'll add some basic interactivity to our movie and
integrate it into a Web page. |
|
|
| |
Open the Library palette for your movie by choosing Library from the Window
menu. See the Options pulldown menu in the upper-right corner? Select New
Symbol, name it Button, and select Button Behavior. After hitting OK, you'll
be able to edit the symbol (also, the movie will be hidden).
Select Grid from the View menu to help you with alignment. Choose the Text
Tool (with a bold, sans-serif font of 18 points). Type "CLICK ME" in the
center of the Stage. Next, draw a simple button by selecting the Rectangle
tool. Set the line thickness to 2.0 points and the color to black. Select a light
color from the Fill Color popup, then create a new layer and draw a rectangle
behind the text you just typed.
You'll notice the Button Symbol Timeline has a label above each of the four
frame cells: Up, Over, Down, and Hit. A different user action triggers each of
these states. We've just drawn the image for the Up state, which is what the
button looks like when it's just sitting there. Over is what it looks like when
the user rolls the mouse over the button. When the user clicks down on it,
that's Down. And Hit defines the hot area of the button — like an image
map, it indicates where the mouse needs to be to trigger the button.
To create an Over state, insert Keyframes for both layers in the Over frame.
Select the text and change its color to pale yellow. Use the Paint Bucket to
refill the fill color of the rectangle with a deep purple or blue.
Next, insert a Keyframe in the Down frame. Using the Arrow tool, draw a
marquee around the button objects and drag it down and to the right about
a quarter of an inch each way.
Above is the Button symbol editing window. There's a popup menu on the
side that leads to the other symbols in the Library, and the movie clapper
icon just to the left brings you back to the movie editor. Note that I've
added another layer to give the Down state a drop shadow.
To define what's hot (and what's not), you need to create a solid black
object in the Hit frame. First, insert a Keyframe in the Hit frame. Delete the
text and the rectangle's outline. Then go to the Up frame and copy the
rectangle there. Return to the Hit frame and select Paste in Place from the
Edit menu. This will paste the rectangle into the same location as in the Up
frame. Using the Paint Bucket, fill in everything with black.
You don't have to create all four states for every button, but doing so can
make for more dynamic buttons. Another thing to note: Symbols can contain
other symbols. This allows you to create more effects and even smaller files.
Each state of the button could contain other graphic symbols.
Now let's place the button into the movie.
Return to the movie by selecting Edit Movie from the Edit menu.
Alternately, you can select Scene 1 from the Edit Scene popup menu.
|
|
|
| |
Now that you have the Stage open in front of you, make the button you just
created serve as the Start button for your movie. For the best effect, you
might want to hide the animation when the button first appears. D'oh! The
animation starts in Frame 1.
To get around this, just add a new scene
to the movie (choose Insert, then
Scene). To toggle between scenes, you
can use the Edit Scene menu as
described on the previous page.
Alternately, you can navigate between
scenes and modify their properties from
the Scene Inspector Window. Select
Scene 1 and click Properties to rename it
Animation. With Scene 2 active, rename
it Start Button. Drag Start Button above
Animation to change the play order. Now
the scenes will play one after another
(unless you assign actions to make
something else happen). Separating a
movie into scenes like this doesn't affect
the final Shockwave movie at all, and it
helps you organize separate content. Unlike layers, you should use them
sparingly, as it is difficult to create interaction between scenes.
Another way to change the order of things is to limit the movie to one scene
and rearrange some frames. To do this, hold down the Command button on
a Macintosh (on Windows, use the Control button) and click down on the
Keyframe you want to move, dragging it to the desired location.
At this point, you should be in the scene named Start Button. Since you just
created this scene, there will be a blank Stage and Timeline. In this scene,
change the name Layer 1 to Button 1. Open the Library and select the
symbol Button. Drag the button from the Library preview onto the center of
the Stage in order to place it.
By default, Flash movies play from the first frame all the way through to the
last. But you want the movie to stop at the frame with the button and then
move on only if a user clicks on it. This is possible because you can assign
actions to either placed symbols or Keyframes.
First, assign a Keyframe action to stop the movie by selecting Modify and
Frame and then clicking on the Actions tab. Next, click on the plus sign and
select Stop as the action. Then click OK. You have just applied an action to
the frame. Stop is the simplest action in Flash; most other actions will
require additional input.
As things now stand, the movie stops at the button and stays there, never
continuing on to play the entire animation. To make it interactive, you need
to assign an action to the button itself. First, disable the button so you can
edit it by choosing Control and then Enable Buttons. Now select the Button
symbol and choose Modify. Then select Instance. Add On MouseEvent as an
action from the Actions palette. Check Release in the parameters area (this
tells the movie to do something after the user has clicked the mouse). Add
GoTo to tell the movie what to do after the user releases the mouse. Select
Animation from the Scene pulldown menu, enter "1" as the frame number,
and check Go to and Play. Click OK.
Now when the user rolls over the button and releases the mouse, the button
will tell the movie, "Go to the Animation scene, Frame 1, and start playing."
Do you want to see your interactive movie in action? Select Control and
Enable Buttons and then click on the button. |
|
|
| |
Adding a Link to Your Animation
A simple way to integrate Flash with HTML is by using the Get URL action.
Make sure that you're in the Animation scene and create a new layer right
after it named Button 2. To accommodate the button, you need to extend
the movie by one frame. Starting from Frame 21 of the top layer, click and
drag to Frame 21 of the bottom layer. With the column of layers highlighted,
select Frame from the Insert menu. All the layers should now be extended
by one frame. Now select the last frame of the Circle layer, Insert, and then
Blank Keyframe (a shortcut is to click on that frame and wait a second until
a menu pops up), which should make the circle disappear in that frame.
To make a button appear, insert a Keyframe at the last frame of the Button
2 layer. Then drag Button 1 from the Library palette onto the Stage window
(make sure Button 2 is actually your current layer). It may be obscured by
other objects in the movie, especially if you went hog wired (sorry) at the
end of Lesson 1. Just drag the label for that layer up to the top of the list to
make it the front layer.
You may have wondered about the tiny icons just below
the Timeline. Ignore the first one with the red line: It's
not very useful. The others control the Onion Skin feature, which allows you
to see adjacent frames of an animation. Click on the left icon, and you'll see
some ghosts of the triangle and the circle. The other icons modify the way
the Onion Skin feature works. Also, notice that the slider bar has changed so
that two brackets surround an area in the Frame Indicator. This corresponds
to the range of frames that become visible via the Onion Skin feature. Move
the frame indicator back and forth to see how it affects the Stage.
 Multiple frames are visible with the Onion Skin feature. Multiple frames are visible with the Onion Skin feature.
You need the Onion Skin feature to help you place the button relative to the
circle since they don't appear in the same frame. Align the Button symbol
over the center of the circle. Click the left Onion Skin icon again to turn it
off.
Double-click on the Button symbol to open the Instance Properties menu.
(Are you having trouble selecting the button because it's active? Select
Control, then Enable Buttons to disable it.) Click on the Actions tab and add
a Get URL action. Flash is smart: It automatically adds the On(Release)
event. Add your favorite URL (naturally, I used http://www.webmonkey.com/)
to the URL field and select "_blank" for the Window field (Window behaves
just like TARGET does in HREF tags).
Using Get URL, you can type "javascript:functionFoo()" to call a JavaScript
function on a Web page, but it won't work on IE 3.0. If you want to use
JavaScript with Flash, you can also try FS Commands or other tricks. |
|
|
| |
Before saving the final movie, it's a good idea to give it a preview. Select
Control followed by Test Movie. After a brief status bar, you'll see a simple
window with just the button visible.
After testing the movie, you may decide that it's all over way too quickly.
Close the preview window and change the frame rate to six frames per
second by selecting Modify and then Movie. Now preview it again and see if
the pacing is more to your liking.
Don't forget some finishing touches: In the preview mode, make sure that
Bandwidth Profiler and Streaming Graph are both selected under the View
menu. These are valuable tools since they let you predict how your audience
will see the final Flash movie. The Profiler and Graph make it possible for
you to see a charted simulation of how the movie streams into a browser.
Under the Control menu, you can specify different download rates: 28.8
Kbps is the most popular choice. You can also see how the movie will play
over a modem by selecting Show Streaming from the same menu.
Streaming is another great feature of Flash.
Imagine how long a 300-KB JPEG would take to
download. Most of your users will never know
because they've already moved on to another
site. But with Flash, it's possible to create a
300-KB file that your users can begin to enjoy
within a matter of seconds. With streaming, the
user's browser downloads the Flash movie frame
by frame. Once the first frame is downloaded, the
movie can start playing while the successive
frames continue to download. If you're a clever
monkey, you can do some pretty complex things
without users ever knowing they are waiting for a
download at all. For example, users could be
happily occupied with some interesting text while a
big sound file loads in the background.
Here's how to use the chart: The scale at the top
represents the playback of the movie. The bar graph at the bottom indicates
when each frame should download during the playing of the movie.
Wherever a bar rises above the red horizontal rule, the movie will probably
have to pause during play to wait for that frame to load, which will stand in
the way of a smooth, effortless playback of your Flash movie. Animations
will be jumpy, and the sound will be choppy. This is usually the case with the
first frame since it can't be preloaded, but you won't need to worry if you
keep it smaller than 8 KB.
But if the first frame does, for some reason, require an exorbitant amount
of time to load or if you can't seem to get smooth streaming in other
frames, you might consider redesigning the movie or streamlining your use
of symbols. If you're really stuck, the advanced tutorial will explain how to
add a "loading ..." message.
But the movie you're creating from this tutorial is so small that streaming
shouldn't be a problem. In fact, my version completely loaded by the fifth
frame.
Now close the preview window and select Export Movie from the File menu.
Name the movie tutorial.swf (the default setting should work fine for this
movie). |
|
|
| |
So you've got your lean, mean Flash movie. Now how do you get it up on the
Web for all the world to see? It's not a problem. Simply embed it in an HTML
page.
Here is the absolute bare-minimum code you need to embed a Shockwave
Flash movie in any browser. It assumes that the user has the proper plug-in
installed (otherwise a broken icon will appear on the Web page):
<OBJECT WIDTH="550" HEIGHT="400">
<PARAM NAME="MOVIE" VALUE="tutorial.swf">
<EMBED SRC="tutorial.swf" WIDTH="550" HEIGHT="400"></EMBED>
</OBJECT>
You'll notice that there are <OBJECT> tags surrounding the <EMBED> tags.
It's important to preserve this order because the <OBJECT> tags are
recognized by Internet Explorer, while Netscape Navigator recognizes the
<EMBED> tags and ignores the <OBJECT> tags.
Unless you're just quickly mocking up a page, I don't recommend using the
minimum code — there are a few attributes that really should be added to
your files. <CLASSID> is specific to the <OBJECT> tag and will tell IE to
automatically load the current ActiveX plug-in if it isn't installed. The
<PLUGINSPAGE> tag is specific to the <EMBED> tag and provides a link to
the Shockwave download page if the Netscape browser doesn't have it. The
<LOOP> attribute tells the movie whether or not to repeat indefinitely (use
"false" for the movie you just created). The <PLAY> tag tells the movie to
just display the first frame (false) or continue playing (true). In our case,
this is a bit redundant since we've already placed an action in the movie to
do this. The <BGCOLOR> attribute will override the movie's background
color. And <QUALITY> specifies whether or not the browser will use
antialiasing to display the images. The <AUTOHIGH> tag instructs the
browser to try to render the movie with antialiasing but to stop using
antialiasing if it slows things down too much. That's the best setting in most
cases. For more information, here's a list of all the attributes.
Here's a good, basic HTML rule of thumb to follow: The <EMBED> tag is for
Navigator-compatible browsers, and the <OBJECT> tag is for
Explorer-compatible browsers. The tags are in this particular order to ensure
that either type of browser will read the appropriate code and ignore the
rest. If you want to dig deeper, there's some detailed documentation in the
Help files that come with Flash.
<OBJECT
CLASSID="clsid:D27CDB6E-AE6D-11cf-96B8-444553540000"
WIDTH="100" HEIGHT="100"
CODEBASE="http://active.macromedia.com/flash4/cabs/swflash.cab#version=4,0,0,0">
<PARAM NAME="MOVIE" VALUE="moviename.swf">
<PARAM NAME="PLAY" VALUE="true">
<PARAM NAME="LOOP" VALUE="true">
<PARAM NAME="QUALITY" VALUE="high">
<EMBED SRC="moviename.swf"
WIDTH="100" HEIGHT="100"
PLAY="true" LOOP="true" QUALITY="high"
PLUGINSPAGE="http://www.macromedia.com/shockwave/download/index.cgi?
P1_Prod_Version=ShockwaveFlash">
</EMBED>
</OBJECT>
After all that, I'm going to let the cat out of the bag: You don't need to
know all this code to embed Flash into your Web pages (but it does help).
Just use the Publish command, available under the File menu.
Not only will Publish create the <OBJECT> and <EMBED> tags for you, it can
also generate the JavaScript that checks if the users' browsers have the
required plug-in. And if users' equipment isn't up to the task, it can
generate a GIF as an alternative to the Shockwave movie. It can even
supply a Java applet as a temporary plug-in (but I don't recommend it) or a
QuickTime movie.
In Publish Settings, which can be found under the File menu, I recommend
selecting Flash, HTML, and GIF. You can specify the settings from the other
tabs — the defaults are usually fine. When you're ready, click the Publish
button and Flash will create everything you need in the same folder as your
original file. You can open the HTML document that Flash created, copy the
appropriate code into another Web page, and make any refinements there.
Now you have your Flash Shockwave movie successfully embedded in your
Web page.
When you're ready to publish the movie to the world, you just FTP the files
to your Web server. Nothing else is needed, but be sure your server's MIME
settings are correct. If you don't know how to do this, ask your system
administrator or people who look like they know what they're doing. |
|
|
|
|