|
|
|
| |
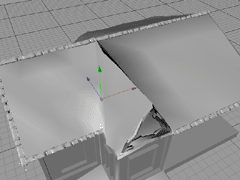
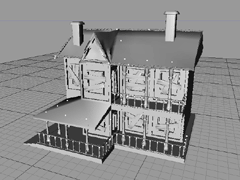
| Every small town has a run-down, weather-beaten old country house. When children pass, they stop long enough to recount the story told to them by their elders about the murder that occurred in the upstairs room and the many sightings of ghosts that linger there. The unbeliever who balks at the story is undoubtedly dared to enter the house alone. Even adults peer into the windows from the sidewalk secretly hoping to catch a glimpse of the fabled spirits. This is one such house. |
 |
|
| |
 |
MODELING
BASIC STRUCTURE
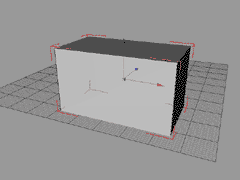
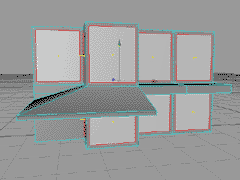
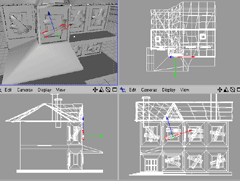
Step 1: Start off by creating a cube. Double click on the cube icon in the Object Manager to change the parametric settings of the cube. Set the sizes so you have a fairly large cube (Shown here at X=6000m, Y=3500m, Z=3500m) with 4 segments for X. Change the cube to a polygonal object by making it editable (Structure=>Make Editable or Hotkey-'C') and rename the cube "House." A proper naming scheme is crucial to maintaining a smooth workflow and efficiency. |
|
| |
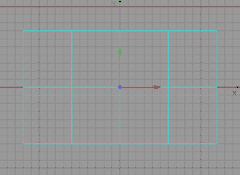
| Step 2: You'll be making knife cuts and using extrusion tools to create the windows and detailing on the building later in the tutorial. First, adjust your snapping tools to make your job much easier when knifing the cube. In the Snap Settings dialog, check Enable Snapping and then click the World Grid tab to change the settings. Set the Dynamic Grid to None, and set the Grid Spacing to 250m. (Note: While working, you may want to disable the snapping whenever moving objects or points around so you can be more precise.) Make horizontal knife cuts at Y=0m and Y=-250m. You are now ready to begin extruding and manipulating polygons to create building details. |
 |
|
| |
 |
HOUSE BALCONY AND EXTENSION
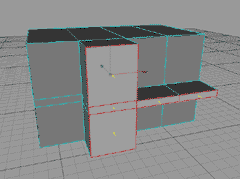
Step 3: Select the polygons for the second story balcony floor and the building's extension as shown and Extrude them 1000m. |
|
| |
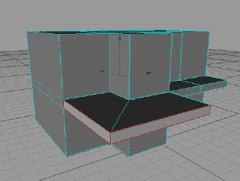
| Step 4: Now select the two polygons from which the entrance overhang will attach. Go to the Active Tool Dialog and enter 95 degrees in the Maximum Angle field. This will allow you to clean up the next extrusion you are about to make. Extrude them 1500m. |
 |
|
| |
 |
Step 5: Scale the currently selected polygons down to Y=100m. Now move them down to around Y=-500m so they form a canopy. Select all the polygons that make up the canopy as shown (including the bottom polygons of the canopy) and go to Selection=>Set Selection to save the selection. Once saved you can name the selection in the object manager and then restrict textures to that selection later. This will be very useful when applying materials to the model later. |
|
| |
| WINDOWS
Step 6: Create the windows for the house by selecting all of the rectangular polygons on the front of the house minus the one on the bottom left (this will be for the door). Select the Extrude Inner tool and in the Active Tool dialog box uncheck Preserve Groups. This will allow you to Extrude Inner each polygon separately. Extrude Inner about 100m. |
 |
|
| |
 |
Step 7: Now switch to the Extrude tool and Extrude -100m. Switch back to the Extrude Inner tool and Extrude Inner 250m. Extrude again 100m. Extrude Inner again 50m. Finally, Extrude -100m. This will give you the windows with their framing. |
|
| |
| SAVING SELECTIONS
Step 8: You should now have the basic geometry down for the windows. Your next task will be to save out polygon selections so that you can apply different materials to the different parts of the building. Save your current selection and name it "Windows." Next use the Grow Selection tool to select the framework outside of the windows. Using the Grow Selection function three times should give you the complete selection of the window frames. |
 |
|
| |
 |
Step 9: Double click on the Window Selection icon in the Object Manager and choose Deselect Polygons. This leaves you with a selection of just the frames, minus the actual window panes as shown above. Set this new selection and name it Window Frames. When making a new selection like this be sure to deselect any existing selection sets in the Object manager. Otherwise, when you choose to set a new selection, it will overwrite the one you have highlighted. |
|
| |
| Step 10: Use these techniques to create a selection set for the outer framework. (The outer framework and the window frames can be combined into one selection set if you plan on using the same material for both sets). Once you're happy with the windows you can create a simple door using the same techniques. Select the polygon left untouched on the bottom left and use the Extrude Inner until you have a basic door shape. Move the polygon down so it rests on the base of the house. Subdivide the polygon twice and then use the Extrude Inner tool to create individual panels. Extrude or bevel these panels to create some door detail. Save out the selection for the door as you did for the windows. |
 |
|
| |
 |
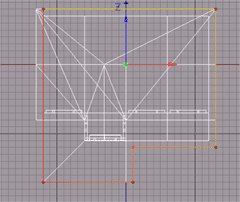
ROOFING
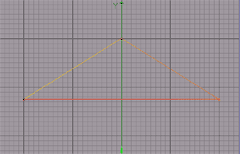
Step 11: There are many methods of creating the roof. Here, you'll be using an Extrude NURBS object. A simple triangle spline profile will work fine here. Simply switch to a side view and use the Linear spline tool to create a triangle spline. Point Coordinates shown here are: (X=0m, Y=1750m, Z=-2000m), (X=0m, Y=3000m, Z=0m), and (X=0m, Y=1750m, Z=2000m). To close the spline double click on the spline icon in the object manager and check the Close Spline box. |
|
| |
| Step 12: Bring in an Extrude NURBS object and double click on the icon in the object manager to change its settings. Bring the Z value down to 0 and set the X value at 6500m. Drag and drop the spline onto the Extrude NURBS object and then move the object to X=-3250m. |
 |
|
| |
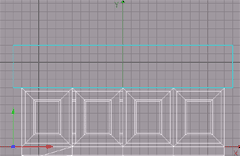 |
Step 13: You're going to pull out a portion of the roof to cover the building extension as well as a portion for the balcony. Make the Extrude NURBS object editable, rename it Roof, and switch to the front view. |
|
| |
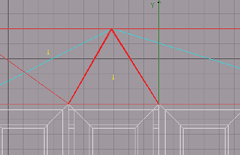
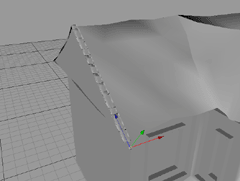
| Step 14: Make a triangular knife cut above the building extension. Be sure that snapping is enabled so your cuts will be precise. Select the front roof polygon and make a cut from the top of the roof (at X=-750m) down to the corner of the building extension (X=-1500m) and another cut from the same point at the top of the roof to the opposite corner of the building extension (X=0m). |
 |
|
| |
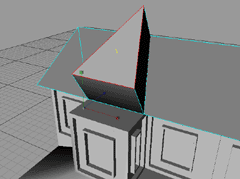 |
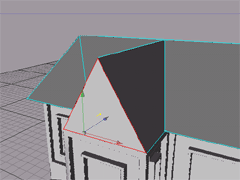
Step 15: Select the new triangle polygon you created and extrude it 1000m. |
|
| |
| Step 16: Now rotate the polygon so that it is perpendicular to the ground and parallel with the building face. Scale the polygon down along the Y axis so its size is 1250m. Move the polygon down and over so that the roofing is directly over the building extension. |
 |
|
| |
 |
Step 17: To finish off this section, Extrude Inner the triangle polygon 100m and the extrude it -200m. Save this selected polygon as a selection set to texture it differently than the rest of the roof later on. |
|
| |
| Step 18: Now you need to resize the right side of the roof so that it covers the balcony. Select the polygons making up the right side of the roof (right of the extension you just pulled out) and use the Coordinates Manager to change the size so that Z=5600m. You may also need to select one of the caps in the Roof hierarchy and change that separately. |
 |
|
| |
 |
SHINGLES
Step 19: The roof looks a little too perfect as it is right now. You can use a number of methods to make the roof look worn and weathered. Subdivide the roof a couple times and use the crumple tool to get rid of the perfectly sharp edges and corners. Try an axial crumple with a radius of about 50m on each axis. |
|
| |
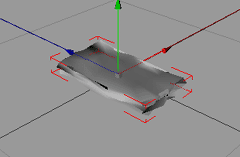
| Step 20: To avoid the roof looking a bit flat on the edges, you can create a single roof shingle and then use instances to create many shingles that can be placed wherever you wish. Open a new scene or hide your house so you have a clean workspace, and then bring in a cube. Rename the cube "Shingle" and set the size to somewhere around X=150m, Y=20m, and Z=200m with around 5 segments for each side. |
|
| |
| Step 21: Make the shingle editable and run a crumple on it to distort its shape. |
 |
|
| |
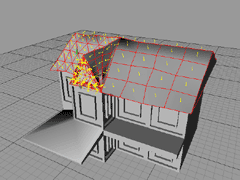
| Step 22:Now use the duplicate function to create a bunch of copies of the shingle to move around. In the Duplicate dialog enter 12 for copies and check the box for Create Instances. Enter 2400 for Z Move. Run Randomize on the new object group of shingles to make them look ragged. |
|
| |
 |
Step 23: Move and rotate the new Shingle object group so that it fits in place on the roof. |
|
| |
| Step 24: You can make instances of this object group and complete the roof by having the shingles go around the roof perimeter. |
 |
|
| |
 |
PORCH
Step 25: A simple base will do for the porch. Switch to the top view and draw a spline around the perimeter of the house with the Linear Spline tool, making it just slightly larger than the house itself. Bring in an Extrude NURBS object and drop in the spline. |
|
| |
| Step 26: In the Extrude NURBS dialog set the Z direction to 0m and set the Y direction to 200m. Now move the Extrude NURBS object down to Y=-1950m. |
 |
|
| |
 |
Step 27: Name the Extrude NURBS object "Porch" and make it editable. You're going to pull out the stairs from the side of the porch. Select the side polygon next to the door and subdivide it about three times. Select polygons for the stairs |
|
| |
| Step 28: Extrude them about 250m. Decrease the number of polygons you have selected and extrude out again about 250m. Repeat this process until you have a nice set of stairs. |
 |
|
| |
| CHIMNEYS
Step 29: Adding a couple of chimneys to the house is a simple way to make the house look a lot more detailed. The chimneys here are just cube objects with a fillet. The cube is then made editable and the top polygons of the cube are smooth shifted creating the chimney bevel. Bring in a cube, rename it "Chimney," and change the size to X=300m, Y=2000m, and Z=300m with the Fillet box checked. Position the cube in a logical place on the rooftop. The position shown is X=-2600m, Y=2300m, Z=-1000m. |
|
| |
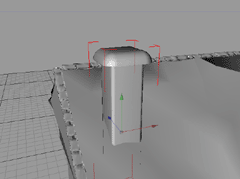 |
Step 30: Now make the cube editable and use the side view and the rectangular selection tool (with "Only Select Visible Elements" unchecked) to select the polygons which make up the top fillet of the cube. Switch to the smooth shift tool and smooth shift the polygons about 100m. |
|
| |
| Step 31: Select the very top polygon and extrude it about -1000m to make it appear hollowed out. Now you can copy the chimney and move it to another spot on the roof. The position of the second chimney here is X=2000m, Y=2750m, Z=-750m. |
|
| |
| WINDOW BOARDS
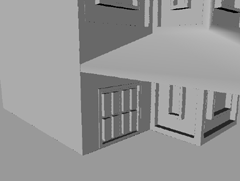
Step 32: To make this house look creepy and abandoned, board up the windows by making several long, thin cubes and placing them creatively over the window frames. The sizes of the boards used here are X=200m, Y=50m, Z=1000m. You can crumple the boards to make them look old and worn down. Make several copies of the board and use the front and side views to position them over the windows. Rotate each board a little differently so they look like they were randomly and hastily nailed on. Once you're done with that its time to create the rail and the supports to add a lot of detail to the house and give it some personality. |
 |
|
| |
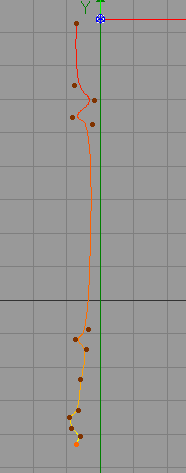 |
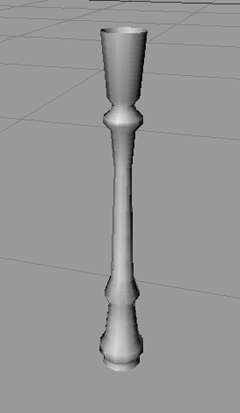
SUPPORTS
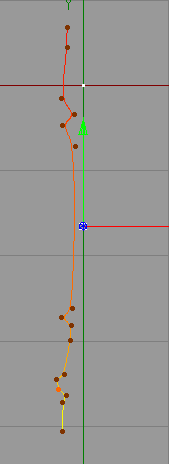
Step 33: Open a new scene to create the support post. Create a profile spline for the support as shown with the B-Spline Tool and then bring in a Lathe NURBS object. |
|
| |
| Step 34: In the Lathe NURBS dialog change the V Direction Subdivision to 12 and turn off caps. Drop the spline into the Lathe NURBS object and rename it Support Lathe. |
 |
|
| |
 |
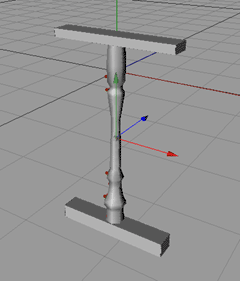
Step 35: Copy your support object into the house scene and position it so that it fits under the overhang. You may need to scale the support to fit the house. Its height should be somewhere around 1250m. Start making instances of the support object and place them along the porch so they appear to be holding up the overhang. Make two instances and position them so that you see three supports lined up from the front view. You can group together these supports and name the group "3 supports," then make an instance of that group. Now place the 3 Support instance under the balcony. You may need to scale this instance so that the supports are tall enough to actually support the balcony. Make a copy of this instance and move it up so that there are 3 supports on the balcony holding up the roof. Again, you may need to scale the supports so they are tall enough to reach the roof while still resting on the balcony floor. |
|
| |
| PORCH RAIL
Step 36: Your next task will be to create a rail, which runs along the front of the house and the balcony. The process is very similar to the supports you just made. Only this time your Lathe NURBS rail post object should be about a third the size of the support and you are going to create many more instances of this to create the rail. Open a new scene and draw out your spline profile for the rail post with the B-Spline tool, it should look similar to the support profile. |
 |
|
| |
| Step 37: Use a Lathe NURBS to get your object as you did the support. In the Lathe NURBS dialog change the V Direction Subdivision to 7 and turn off caps. |
|
| |
 |
Step 38: Bring in a couple of cubes to serve as the handrail for the rail. Place one cube on top of the Rail Post and place one underneath it for the base of the rail. Group the two cubes and the Lathe NURBS object together and name the group "Rail Post." |
|
| |
| Step 39: Copy the Rail Post into the main scene and position it at the corner of the porch on the far left side. You may need to resize your post depending on how you built the spline, your post should be approximately 500m tall. |
|
| |
| Step 40: Create instances or use the Duplicate function to create ten copies of the post. Evenly space these ten posts on the front end of the porch and then group all the posts together. Give the group a name like "Rail." Now make an instance of this group and move the rail instance so it spans the porch on the right side of the house. Make a copy of this instance and move it up so it rests on the balcony. There are still gaps in your rail, so go back to your rail group and copy out four of the posts. Group these 4 Post copies and name the group "Small Rail." Now create a couple instances of the small rail object and fill in the rail gaps. Leave the far left side of the porch open so people can walk up the stairs and into the house if they dare. |
 |
|
| |
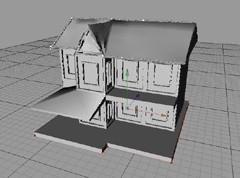
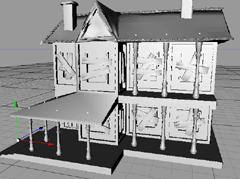
| That completes the basic modeling for the house. Of course you can always go back and add more detail if you'd like.
MATERIALS AND LIGHTING
This scene makes use of a lot of dark, grainy, old looking materials. The lighting will emulate the bluish hue of the moon. All of the materials used for the house can be found on the CINEMA 4D XL version 6 product CD in the Tex directory. You'll find many of them in the "Even More" folder. There are a lot of great textures there. Many of the wood materials in that folder were used for the house, different woods were applied to different parts and selection sets of the house. The lighting and material specifics are listed below, but be creative and feel free to play around with the scene! |
|
| |
| - Wall 3.jpg was used for the Chimneys. The projection setting is: UVW - tiled X=1 Y=5.
- Wall 4.jpg was used for the House. The projection setting is: Cubic tiled X=.25 Y=.25.
- Wood 7.jpg was used for the Door Selection Set on the House. The projection setting is: Cubic - tiled X=.3 Y=.5.
- Wood 8.jpg was used for the Porch. The projection setting is: Cubic - tiled X=.25 Y=.1.
- Wood 10.jpg was used for the Rails, Supports, and the Framework Selection Set on the House.
- Oak9.jpg was used for the Window Boards. The projection setting is: Cubic, H Rotation=90.
- Stone 7.jpg (re-colored brown in an image editing program) was used for the Shingles and Roofing. The projection setting is: UVW - tiled X=2 Y=5.
All of these images were used in the color channel and bump channel (set to 100%) with a specular of Height=10 Width=60.
Use a transparent material for the Windows Selection Set on the House. Create a new material and use the Dirt.jpg file (located in the same directory) in the Alpha Channel. This material can then be applied to any part of the house to make it dirty, dark, and grimy. (make sure "Soft Image Alpha" and "Invert" are all checked in the material dialog.) |
|
| |
| There are five lights used in this scene. Three lights illuminate the house from the outside, one is used as a fill for the front of the house, and the last light is a volumetric visible spotlight shining out of the top front window. The goal here is to bring out as much texture detail of the house model as possible while maintaining a spooky and haunted atmosphere. An Environment object is also used in this scene with fog at 20000m.
The Key Light for this scene is positioned above and in front of the house. This light is meant to reproduce the moonlight affect. Settings for the Key Light are:
General: Spot(Round), R=80 G=80 B=85 Br=100, Shadow=Soft
Shadow: Map Size=500X500, Sample Radius=1
Position: X=33100m, Y=22260m, Z=-14700m
Rotation: H=66, P=-30, B=0
There are two Fill Lights to bring out detail in the house. Settings for the first Fill Light are: General: Omni, R=55 G=60 B=90 Br=100, Shadow=Soft
Shadow: Map Size=500X500, Sample Radius=1
Position: X=-6460m, Y=2230m, Z=-5300m
Settings for the second Fill Light are: General: Spot(Square), R=40 G=50 B=80 Br=75
Details: Outer Angle=125m, Brightness=200 Falloff=Linear, Outer Distance=8500m
Position: X=2500m, Y=-750m, Z=-6800m Rotation: H=8.5, P=0, B=0
A Back Light is added to create some depth in the scene. This light is set below and behind the house. Settings for the Back Light are: General: Omni, R=0 G=35 B=65 Br=100
Position: X=-9500m, Y=-4175m, Z=3845m
Lastly, add a light to simulate the specter that lives there. Settings for the Window Light are: General: Spot(Square), R=90 G=85 B=50 Br=350,
Shadow=Soft, Visible Light=Volumetric
Position: X=-1000m, Y=840m, Z=-800m
Rotation: H=-173, P=0, B=0
Noise=Visibility
Details: Outer Angle=35m, Brightness=200 Falloff=Inv.Square, Outer Distance=3275m
Visible Light: Outer Distance=3275m, Brightness=200% |
|
|
|