-Levels-
Levels is a tool in Photoshop and other image editing programs which can move and stretch the brightness levels of an image histogram. It has the power to adjust brightness, contrast, and tonal range by specifying the location of complete black, complete white, and midtones in a histogram. Since every photo's histogram is unique, there is no single way to adjust the levels for all your photos. A proper understanding of how to adjust the levels of an image histogram will help you better represent tones in the final image.
| The levels tool can move and stretch brightness levels in a histogram using three main components: a black point, white point and midtone slider. The position of the black and white point sliders redefine the histogram's "Input Levels" so they are mapped to the "Output Levels" (default is black (0) or white (255), respectively), whereas the midtone slider redefines the location of middle gray (128). Each slider is shown below as they appear in Photoshop's levels tool, with added blue labels for clarity: |  |
When considering adjusting the black and white point levels of your histogram,
ask yourself: is there any region in the image which should be completely
black or white, and does the image histogram show this?
Most images look best when they utilize the full range dark to light which
can be displayed on your screen or in a print. This means that it is often
best to perform levels such that the histogram extends all the way from
black (0) to white (255). Images which do not extend to fill the entire
tonal range often look washed out and can lack impact. The image below
was taken in direct sunlight and includes both bright clouds and dark
stone shadows-- an example of where there should be at least some regions
that are portrayed as nearly white or black.
Midtone Level
Moving the midtones slider compresses or stretches the tones to the left
or right of the slider, depending on which direction it is moved. Movement
to the left stretches the histogram to the its right and compresses the
histogram to its left (thereby brightening the image by stretching out
the shadows and compressing the highlights), whereas movement to the right
performs the opposite. Therefore, the midtone slider's main use is to
brighten or darken the midtones within an image.
When else should one use the midtone slider? Consider the following scenario:
your image should contain full black and white, and even though the histogram
extends to full black, it does not extend to white. If you move the white
point slider so that it reaches the edge of the histogram, you end up
making the image much brighter and overexposed. Using the midtone slider
in conjunction with the white point slider can help you maintain the brightness
in the rest of your image, while still stretching the highlights to white:
-Curves-
The Photoshop curves tool is perhaps the most powerful and flexible image transformation, yet it may also be one of the most intimidating. Since photographers effectively paint with light, curves is central to their practice because it affects light's two primary influences: tones and contrast. Tonal curves are also what give different film types their unique character, so understanding how they work allows one to mimic any film-- without ever having to retake the photograph.
| Similar to Photoshop levels, the curves tool can take input tones and selectively stretch or compress them. Unlike levels however, which only has black, white and midpoint control, a tonal curve is controlled using any number of anchor points (small squares below, up to a total of 16). The result of a given curve can be visualized by following a test input tone up to the curve, then over to its resulting output tone. A diagonal line through the center will therefore leave tones unchanged. | 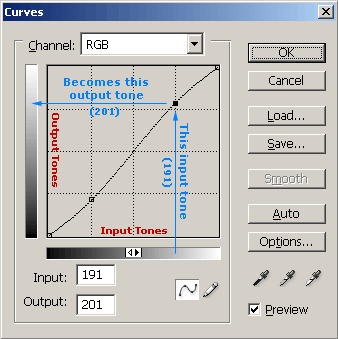 |