Digital Printing Technology
Pixels and crystals are now on equal footing as affordable digital cameras allow us to produce photographic files equal or superior to the conventional film images of the twentieth century. As digital cameras increase their capacity to store more pixels so must the printers that are used to output these images. Every step forward in digital camera resolution must be matched by advancements in printing technology.
Conventional
color photographic printing by means of a chemical darkroom produces
continuous tone analog images that are made up of random dots of color
dye that formed around microscopic pieces of silver.
Digital prints can be made on a variety of papers with wax
or pigmented inks, with laser light on conventional photographic papers,
pigments that are sublimated into a gas and blended to form images
or they can be etched into a metal plate and printed with lithographers
inks. What most of these
methods have in common is that the image is first converted by a computer
into a series of dots. The
limiting and differentiating factor in all digital means of printing
images is the way these dots are mechanically placed on a surface
and the size of the smallest dot the device is able to produce. There are many printer choices, from low to high resolution,
capable of simulating continuous tone photographs. Some can make digital prints that are indistinguishable from
chemically made prints others can produce images with color or smoothness
not possible with traditional photographic processes. Figure 8.1 shows the differences in how a continuous tone image
is formed from film, digitally on a screen, and by ink.
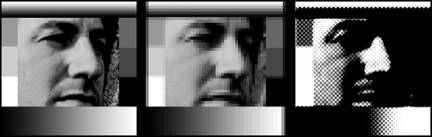
Forming
a Continuous Tone Image from Film (grain), Digital (pixels), and ink
(halftone).
Displaying the Image
Screen Resolution (PPI) & Dot Pitch
Screen
resolution, pixels per inch (ppi), and print resolution, dots per
inch (dpi), are two different measurements and are often used interchangeably.
They must be clearly understood to properly scan, scale (image
size), and to prepare images for the web or to print.
Screen resolution (ppi) is the maximum number of pixels per
inch a monitor can display at any one time.
PPI is determined by the manufacturer and cannot be changed. It is usually between 72 and 90ppi, but varies slightly from
monitor to monitor. The
dot pitch (Figure 8.2) rating of any screen only determines the quality
of the display monitor. PPI
is measured in millimeters (mm) and theoretically the lower the number
the sharper the image. Although
cathode ray tube (CRT) and liquid crystal display (LCD) screens are
mechanically different, the dot pitch rating is still the same and
ultimately only slightly affects image size on a screen, but NOT
print size.
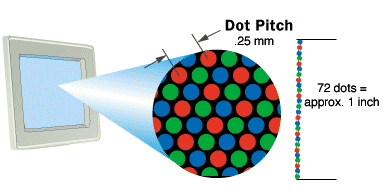
Dot Pitch
Print
Resolution (DPI)
Print
resolution (dpi) or dots per square inch refers to the number of dots
a printer can apply within one physical inch on paper.
Dpi is variable and many inexpensive printers average 1200
dots per square inch. Image quality is increased when more and
smaller dots are contained within the same inch of physical space
on the paper or material. The
more dots per square inch, the more continuous tone and photographic
the image will look. The
most common color printer for photographs is an ink-jet printer that
sprays tiny dots of color to create an image from a digital file.
Since
screen resolution (ppi) and printer resolution (dpi) are two different
measurements they can become confusing when scanning, scaling or resizing
your digital photograph for printing.
Figure 8.4 demonstrates what happens to an image that is scanned
at a dpi higher than 72 and viewed on the display at 100 percent.
The screen image will appear larger than one anticipated, requiring
re-sizing of the screen image.
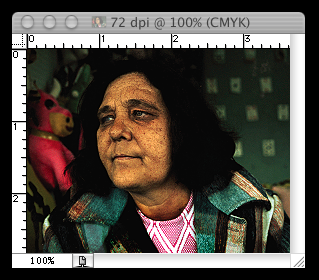
This
photograph was scanned at 72 dpi with a print dimension of 3 - 5/8
x 2 - 7/8 inches. Notice the picture and rulers closely
approximate 1 inch of actual length and width when viewed at 100 percent
in the photo-imaging software.
With this 72 dpi scan the screen size and print size will be
similar because the screen dot pitch (ppi) closely resembles the true
physical inch when output to paper. This would be considered a 1:1 ratio in
regards to scale when viewing at 100 percent on screen when compared
to the print size.
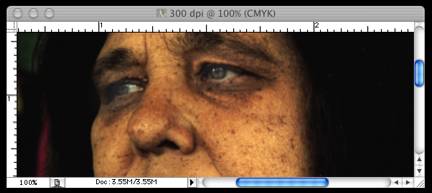
Here the same photograph was re-scanned at 300 dpi at the same dimensions, 3 - 5/8 x 2 - 7/8 inches. Notice that the screen rulers now exceed 1 inch of actual length and width when viewed at 100 percent. Now it requires 300 screen pixels (ppi) to represent the 300 dots (dpi) as one inch. This would be considered a 4:1 ratio in regards to the imageÕs scale on screen when compared to the actual print size. The image will still print 3 - 5/8 x 2 - 7/8 inches, but now at higher resolution.
The Image
Window
To
help keep track of all the variables in a digital file, software programs
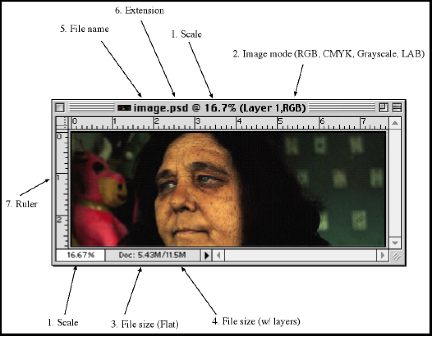
display many key pieces of information about the image. Figure 8.5 identifies this data that surrounds
the working image and describes their meaning.
-
Scale: Since a monitor can only display about 72 ppi your image program scales the image to show the difference between the screen display and the bit depth (resolution in ppi) of the actual image. Figure 8.5 above shows an image with a bit depth of 300ppi image. In this case the software has scaled the display of the image to only show 16.7 percent of the actual pixels contained in the image.
-
Image Mode: Imaging programs allow one to work in a variety of color modes including RGB, CMYK, Grayscale, Bitmapped, Duotone, or LAB. Some filters and operations can only be performed in RGB mode.
-
File Size: This area shows the size of the file when it contains only one working layer.
-
File Size (with layers): Layers are transparent surfaces that can be individually placed on top of the original image, adding to the file size. You can move, scale, draw, edit, and paste on to any layer without disturbing the other layers or the original image. Adding layers while working allows you to work separately on the various parts of your image, which helps to organize and manage the workflow. Flattening an image converts all layers back into one, reducing the file size. Images that are sent to high quality printers often have to be flattened before printing.
-
File Name: Most imaging software will display the name of the file somewhere along the top of the image window.
-
Extension: Extensions describe the file format to the computerÕs operating system. PCÕs and web browsers require the three-letter file extension be included in a fileÕs name, such as .doc or .jpg, in order for it to be opened or displayed.
-
Ruler: Most imaging software includes an option for displaying a ruler along side an image. The user can usually define the particular units a ruler uses.
Sizing a Digital File
As
previously discussed, file size in megabytes (MB), screen resolution
(PPI), and print resolution (DPI), are three different measurements
that need to be understood to be able to properly scale, scan, and
prepare images for printing or the Web.
Although closely related MB, PPI and DPI are not a true measure
of the actual image size when outputted to paper or viewed on the
screen.
The size and quality of the final print is first determined
by how many pixels were originally exposed by the camera or scanner.
The original exposure or scan is absolutely crucial towards determining
levels of quality for the final print. Digital cameras capture images
based on the common settings of High, Fine, Normal, and Basic.
Low-resolution settings, such as Basic for the camera or 72
dpi for scanning, will produce a file usually of under one megabyte
that is only suitable for images appearing on the computer screen
or on a Web page.
Once
the file is captured/scanned, changing the resolution will affect
the file in different ways, depending on how the change is made. For example, a digital camera using the Fine setting might
produce an image file of 1600 x 1200 pixels. Depending on the camera and software, this image may import
into your software program at a default resolution of 72 dpi and pixels
dimensions of 1600 x 1200, which will make the print size 22.222 x
16.667 inches at 72 dpi
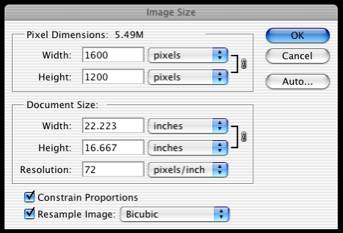
The print size is very large at 72 dpi and when outputted to paper would produce a soft-focus or pixilated image with only 72 dots per square inch. Changing the resolution to 300 dpi would more closely match conventional photographic quality. In this image, changing the default 72 dpi up to 300 dpi, for seemingly better visual acuity, will result in adding 31 million more pixels to the image because width and height dimensions were not scaled down proportionately! The computer has to resample, also known as interpolation (see next section), by placing extra pixels in the image. To do this the computer looks at adjacent pixels and places new pixels between them that are based on an average of the original two, which creates a look called pixelization.
To change the resolution (dpi) to an existing file, simply change the number in the resolution box to 300 dpi (see figure 8.7). This change will not affect the print size or improve the print quality because resampling/interpolation will occur. Only the file size (5.59 MB to 95.4 MB) will change with no increase in detail. The original un-interpolation 72 dpi image file and itÕs new 300 dpi interpolated counterpart will print very similarly. There is no gain in the detail of the interpolated image file. However, re-shooting at a higher pixel dimension is necessary to maintain detail at larger print sizes.

Interpolation
or Resampling
Changing
pixel dimensions forces the software to interpolate the changes.
Interpolating is a set of mathematical logarithms automatically
applied when the original pixel dimensions are changed for resizing. Interpolation cannot add or subtract detail,
it only randomly adds or subtracts pixels making a Òbest effortÓ when
resizing the original pixel dimensions.
There are many interpolating logarithms that perform slightly
different mathematical computations, but the end result is still degradation
of the original image file that will affect image quality as the computer
is literally making up the information.
The
three most common modes of resampling, which appear when the Resample
Image box is checked, are Bicubic, Nearest Neighbor, and Bilinear.
Always use Bicubic interpolation because it gives the smoothest results.
Although Bicubic takes longer to compute the speed of todayÕs
computers make it negligible. Nearest Neighbor is the fastest interpolation
method producing the most jagged results and Bilinear splits the difference
between the two.
Equivalent
Image Size
When
learning to control camera exposure one comes to understand the concept
of equivalent exposure. This model states that when one changes from a slow shutter
speed (1/60 of a second at f/11) to a faster shutter speed, one must
compensate by using a larger aperture (1/125 of a second at f/8) to
maintain the same exposure.
The reverse was also true.
A similar equivalent concept holds true for changing the size
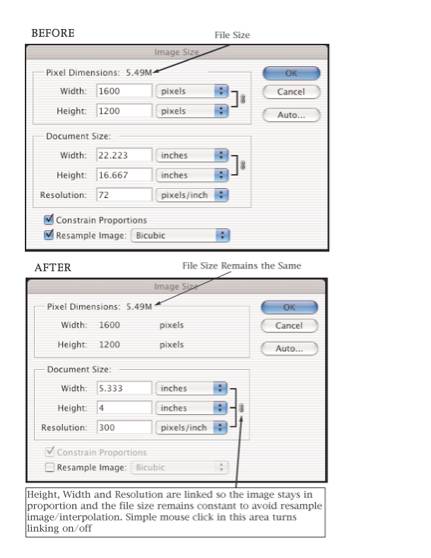
of digital images. Figure 8.8 shows two image size windows for the same image.
By linking the document sizes by checking the Constrain Proportions
box and the Resample Image box one can change the resolution of an
image without the computer adding or subtracting pixels to an image,
thereby maintaining the original image quality (See Figure 8.8.).
Links Between Document Size & Resolution
A simple mouse click in the check box next to Resample Image turns linking on and off.
By constraining the proportions of the height, width, and resolution we can alter the value of one variable and the program automatically compensates by increasing or reducing the other two. Before and After are equivalent because when we add to the resolution the software program automatically subtracts from the height and width to maintain the same file size. Notice in the Pixel Dimensions box the number of pixels referencing height and width has not changed and neither has file size.
The Real Size of a Digital Negative
A
good way to understand the relationship between picture size, pixel
dimensions, and dpi is to think of pixel dimensions as representing
the real size of the Òdigital negativeÓ. The digital negative is the total number of pixels from which
there are a limited number of un-interpolated print dimensions available
to produce un-pixilated images regardless of dpi. Print size or print resolution (dpi) is not as significant
as minimizing the effects of interpolation. A 2.1 megapixel digital
camera or a 300 dpi scan at 4 by 5 inches are both capable of producing
a digital negative of 1,920,000 pixels.
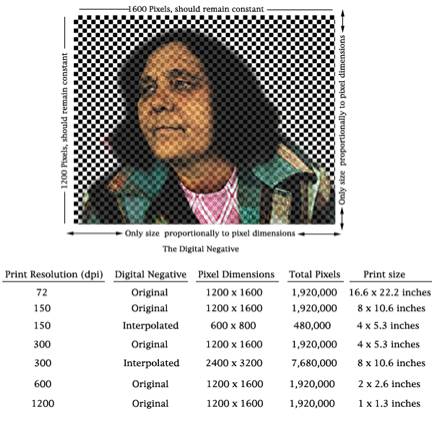
Figure 8.9 illustrates the relationship between dpi, interpolation,
and print size. Note: as the print resolution increases from 72 dpi
to 1200 dpi the print size is proportionately decreased to maintain
the original number of pixels to the digital negative. Also notice
two exceptions, the interpolated files will print less than optimal
because pixels were randomly added or subtracted to compensate for
print dimensions that did not remain proportional to the original
1,920,000 pixels.
Both these interpolated files will show some pixelization but the
file with less than the total original pixels will show less pixelization.
Figure
8.9 The Digital Negative: Avoid Interpolation
Table
8.1 shows how to make sure the original pixel dimensions (ppi) correlate
exactly to the final output size (dpi) in regards to length and width.
The pixel dimensions should always remain constant as the digital
negative is enlarged or reduced.
For example, when using a 2-megapixel camera on the Fine setting
an image file of 1600 (W) x 1200 (L) pixels equaling 1,920,000 total
pixels is made. These 1,920,000 pixels now represent the physical size of the
image and becomes the limiting factor when resizing the image for
optimum results. Since
300 dpi is considered the acceptable printing resolution to create
digital pictures similar to film photographs, one divides 300 into
the original pixel dimensions to determine the optimum output print
dimensions (Table 8.1).
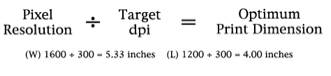
Table
8.1 Calculating Optimum Print Dimensions
Achieving Photographic Quality
Ink-jet Printers: Dpi to Dots to More Dots
Photographic quality ink jet printers are needed to produce prints that have the look of continuous tone. Their print head design allows them to spray minute amounts of inks onto the receiver material at resolutions of 1440 x 720 dpi and higher. They can also deliver subtle detail with more accurate and saturated colors and print on a wider variety of materials than their less expensive office counterparts. These quality printers use more permanent inks and include additional colors greatly increasing the range of colors (color gamut) beyond traditional color photography.
All inkjet printers use different amounts and methods of applying inks to create photo-realistic images. General-purpose quality inkjet printers use four inks, cyan, magenta, yellow and black while higher-end photo quality inkjet printers can easily exceed four colors by adding orange, green and lighter versions of cyan, magenta and gray. Creating photo quality photographs is not only dependent upon how many droplets fit with in an inch (dpi) of space, but also on the size and pattern of the ink droplets. When a photo quality inkjet printer creates an image from a 300 dpi file it is not just creating one droplet of ink for each pixel (ppi) or dot (dpi), but rather it places four or more droplets of ink for each particular dot. Color inkjet printers may have as many as 96 nozzles per color for applying droplets, which is a total of 672 nozzles to apply varying degrees of color and value.
Inkjet
printers are rather complicated printing devices that must control
all those nozzles accurately to create droplets of ink that can convince
the eye of continuous tone. Better inkjet printers are capable of
delivering excellent photo quality between the range of 150 and 360
dpi. Although these printers are capable of
resolutions up to 2880 dpi, it is generally not worth the printing
time and storage space to produce image files greater than the visual
acuity of the human eye.
Paper: Un-coated and Coated
Un-coated
(porous) printing papers are the most readily available papers and
are best identified as the inexpensive xerographic, ink-jet or laser-jet
papers used primarily for text. Structurally these papers are raw
cellulose wood fibers bleached and processed into the standard letter
and legal sized formats. These papers have less uniformity when considering
brightness, surface texture, absorbency and pH levels. These un-coated
papers absorb more ink allowing them to print and dry faster to the
touch. The downside of these materials is that
they are more susceptible to fading due to environmental factors and
exposure to light. Coated papers (micro-porous) have special coatings
that either modify or completely cover the cellulose fiber making
the paper achieve superior print results and archrival qualities.
These papers are designed to resist fading although drying times can
be somewhat longer. Coated papers come in a variety of traditional
photographic surfaces including high gloss, semi gloss, flat matt,
luster and also in many canvas-like textured surfaces. Non-porous
materials are polymer or vinyl based printing materials for banners
or decals. The smart advice is to check the kind of coating or surface
that exists with the printing material to be used and choose the appropriate
type of ink, making sure the existing printer can handle the combination.
Inks: Water-Soluble and Pigment Based
There
are also two groups of inks: water-soluble dye-based and pigment-based.
Inexpensive ink jet printers use water soluble inks and should
only be used when permanence is not a concern, such as for color proofing
and short-term use. Photo quality ink jet printers use pigment-based
inks that contain small waterproof color flecks that makes the inks
more fade resistant and richer in color.
Print
Permanence
There
has not been enough independent empirical testing to accurately predict
the permanence of ink-jet prints plus the equipment and materials
have been in flux. To
maximize longevity use coated (micro-porous) papers and the best quality
pigment-based inks currently available.
When permanence is a major concern, it is best to evaluate
the current array of inks and papers before buying a printer to make
sure everything is compatible and capable of producing the desired
results. Using papers and inks from different manufacturers
is not recommended because manufacturers only test, rate, and guarantee
permanence based upon their own system of papers, inks, and printers. Choosing papers and inks from different
manufacturers may produce the visual results one is looking for, but
be sure the combination has been tested for maximum longevity (see
Chapter 9 for factors affecting permanence).
Printing
Methods & Output Issues
Desktop
Ink-jet Printers
Desktop
Ink-jet printers are inexpensive and use water-soluble inks and plain
paper to make color prints. Better-quality paper will yield higher-quality
images. Some dye-based
ink-jet printers produce prints that are impermanent and can, without
protection, fade within 6 months.
Iris Print
The
iris printer was the first printer used in digital fine art reproduction.
Iris prints are a type of ink-jet print produced by spraying
millions of fine dots of ink per second onto paper.
Created on a spinning drum, these gallery-quality prints can
be made on virtually any material that will accept ink. The iris printer
uses dye-based inks that produce some of the most vibrant and widest
tonal values available. Depending on the type of ink, paper, and coating,
such prints could have a life span ranging from as little as 6 months
but generally iris prints are made to last decades. Iris prints where
once the standard for high quality fine art reproductions but now
has become a special purpose niche process. Although iris prints still
represent the standard in which most digital prints are measured against.
Light-Jet
A
LightJet or Lambda printers are brand names for printers that expose
a digital image directly to color or black-and-white photographic
paper using red, green and blue laser beams. The resulting images are processed in
regular photographic chemistry and therefore possess the same surface
and permanence properties as traditional photographic prints. LightJet prints are extremely sharp and
very close to continuous tone because the LightJetÕs resolution would
exceed 4000 dpi when compared to conventional half-tone printing.
Giclee
Printing
Giclee,
French for squirt, is a chic phrase for ink-jet printing.
Technically, even an inexpensive ink-jet printer produces gicle
prints. Gicle was first associated with Iris printers, which initially
defined the digital fine art print market. It was used to appeal to print connoisseurs who expected state
of the art ink-jet printing with a certain level of permanence, but
the term is not regulated and hence carries no warranties of any sort.
Mural-Size Prints
Creating
photographic high-quality digital images is a reality for both the
consumer and professional and can be seen in art worldÕs embrace of
mural-size prints. Even though digital cameras can exceed
the sharpness of 35mm film cameras, the enlarging limitations remain
constant. Digital photography
is not a magic bullet for making large prints from small cameras. A blow-up from any type of 35mm equivalent
media will show a loss of sharpness due to the increase in grain or
pixelazation in proportion to the size of the enlargement. Once affordable digital image sensors
become available in medium and large formats, film will eventually
become obsolete.
Until this occurs, the best practice for making big fine art
digital imagery is to record the image on a large format film and
scan the film at the highest possible resolution.
Such prints require film scans, in excess of 4000 dpi and up
to 8000 dpi, along with professional scanners and printers.
Making digital prints exceeding the capabilities of desktop
printers, 13inches in height widths up to 40 inches, require floor
model photo quality ink-jet printers.
Many of these printers are capable of printing up to 64 inches
in height and widths as long as the roll of papers will allow (lengths
can exceed 100 feet).
Mixed
Digital Media
With the availability of high quality, large-format printers and a wide variety of printing materials the possibilities of digital mixed media have just begun to be explored. Photographers have always experimented with the surface of the print, some by applying pigment to the surface others by collaging different photographic images and materials together. All of these methods can be brought together using the digital print as well. In addition to traditional glossy paper, manufacturers have developed materials such as artist canvas that can be run through a digital printer and then be painted on with acrylic or oil paints like a conventional canvas. Materials, such as Polysilk cloth, can be printed on and then become waterproof, which allows them to be exposed to the elements or even washed. Other materials include translucent and transparent films that can be used as backlit prints, as photographic negatives or in mutilayered images.
Preparing the Digital Print for Mixed Media
New
developments in digital media are currently being driven by the advertising
industry. Most of the
store displays, such as ads found in supermarkets, are now being produced
on these large format printers. Artists have to be aware of the demands of the advertising
industry when using these new materials.
Advertisers want their materials to be sturdy enough to be
walked on or displayed outdoors, but they are not necessarily interested
in images that will last more than a few months or a few years. Luckily many of the same qualities that make an image last
for 25 months outdoors will allow those same prints to last years
or decades when they are displayed indoors.
One thing that imagemakers can do to protect their images from damaging UV or when preparing images for mixed media applications, such as acrylic or oil paint, is to seal the surface with a spray or liquid coatings. These coatings are water or solvent based and can be used with water sensitive inks. Since many of these coatings can yellow or crack over time, testing a particular combination before use is recommended.
Working With a Computer
As
a camera condenses a three-dimensional scene into a two-dimensional
representation, the computer seamlessly combines different media into
a virtual representation, retaining the qualities of some and eliminating
the qualities of others. Anything
that can be done with a camera, paintbrush, or drafting set can be
replicated on a computer.
Large,
high-resolution images require extra processing time and plenty of
available hard-drive space to operate efficiently.
A 100 MB file should have at least five times that amount (500MB)
of free hard drive space to make use of the imaging software tools
and the filters.
The computer is a powerful tool for experimenting with ideas and design,
but it is not always the best way to produce an image. Images stored on silver-based film provide a tremendous amount
of permanent information that is easy to access, and economic to store. If you are not planning to significantly
manipulate the image, a wise choice still could be the silver-based
photography.
The Color Monitor
All monitors use an additive RGB color system (see Chapter 1). Any combination of these light primaries always produces a lighter result. Since light is transmitted from the image, the colors tend to be more saturated and luminous. The printed image uses a CMYK subtractive system to form an image on a sheet of paper. Any increase in pigment density subtracts the initial amount of light, producing a darker result.There is an inherent visual difference between images seen on your monitor, other monitors, and output devices. Sophisticated monitors allow for color correction as well as contrast and brightness adjustments, but these only affect how the image appears on your monitor and not other monitors and/or paper output. Color management hardware and software is available to help control the color balance between monitors and output.
How
Monitors Show Color
Depending
on the monitor size and the amount of video memory (VRAM) it is possible
to see and manipulate millions of colors with image-processing programs.
All video monitors represent color by displaying minute RGB
dots, which are displayed on the monitor as pure color.
All other colors shown on-screen are a mixture of pixels used
to approximate the color needed.
In addition to full color, images can be produced as a gray
scale, which produces 256 shades of gray, or bitmap images, which
are purely black-and-white.
What Is Bit Color?
Bit
depth describes the number of bits (the smallest unit of information
on a computer) assigned to each pixel and refers to the number of
shades of gray or the number of colors that can be represented by
a single pixel. The greater
the number of bits (2, 4, 8, 16, 24, 32 or 64) the greater the number
of colors and tones each pixel can simulate (see box 8.1). The bit depth of your computerÕs display is the
number of different colors it can show at any given time. The size of the display and the amount
of video RAM you have on the graphics card controls bit depth. 64-bit
color is the highest level of color a computer can produce. 24 bits and above create color variations well
beyond the range of human perception. Even though human perception is limited
to 24 bits and below, 32 and 64 bit color can improve color accuracy
and correction on screen.
Color Management (ICC Profiles)
In
1993 a group of eight software and digital output device manufacturers
formed the International Color Consortium (ICC) to establish and maintain
a set of international color standards.
The group introduced a standard device profile format, known
simply as ICC, to define how different color devices, often made by
different manufacturers, produce color images.
An ICC profile is a file that describes how a particular device
reproduces color (printers or monitors).
These profiles map onto an image file the characteristics of
different output devices with their limited color spaces making the
output of images from varying devices predictable and observable.
Profiles,
Profiles and More Profiles
In
the digital environment every workstation has a unique Òprintable
color spaceÓ sometimes known as Òcolor gamutÓ. ICC profiles are small, digital files
that help the computer determine the actual viewable and printable
color space of the working environment.
These files are sometimes pre-loaded in an image of software
program, but many need to be loaded based on the device.
Color space is determined by everything that goes into making
the image including: the camera or scanner (input), the type monitor
(viewable color space) and the printer along with its specific combination
of inks and paper (output).
The ICC profiles Òre-mapÓ or reassign a new color value to
a digital image when color values are detected outside the viewable
or printable color space. Sometimes the shift is not severe or even
detectable. The standard
ICC profiles, called Ògeneric profiles,Ó are designed as a Òbest guessÓ
method of normalizing many variables over the widest variety of possible
environments and can do a good job.
Factory ICC profiles are best and can reduce time and effort
when color correcting, but not always.
Other
Digital Colors
Many
software applications allow for the manipulation of color according
to its hue, saturation, or luminosity (HSL) or through a licensed
color system such as Truetone¨ or Pantone¨. These last two systems allow for the most
understandable color manipulation on the computer. Process color, or CMYK, is the traditional
printing method of lithographic printers. This set of subtractive primary color is the system used by
most color printers. Many
output devices cannot print all the colors a computer is capable of
processing. Some software packages will warn you if
a particular device cannot print a selected color. Computer users can make color separations for printing using
the CMYK mode. When switching
from RGB to CMYK the computer dulls the screen colors to simulate
a subtractive print. High-end
multi-color printers rely on RGB to manage all their possible color
options. Duo-tone effects, applying a second accenting
color, are also possible.
Digital
Memory
RAM
When
a program begins, its contents are loaded into random access memory
(RAM). Instructions the computer needs to perform its tasks are stored
and processed in RAM chips, sometimes called memory chips, that come
in a variety of sizes, pin configurations, types, and formats.
The amount of RAM a computer has directly affects its performance
and capabilities and is easily expanded.
Most software applications include minimum memory requirements
on their printed material. However,
to effectively run the program you may need much more RAM so it is
prudent to research programs before purchasing them.
ROM
Permanently
installed in the computer, read only memory (ROM) contains the basic
instructions the computer needs to start up and to draw objects on
a screen. Unlike RAM memory, ROM is unalterable.
Hard Disk
The
hard disk, usually installed inside the computer, is where applications
and files are stored. Since image files are often larger than
the available RAM, some software applications use the hard disk to
temporarily store information.
The program shuffles information from the hard disk (the scratch
disk) into RAM, where it is processed.
This enables the program to complete complex operations and
functions, such as ÒundoÓ and Òpreview.Ó
The scratch disk can take up to five times as much space as
the original image because it stores several different versions of
the image. The computerÕs
hard disk must have enough free space to accommodate these temporary
files.
Basic
Digital Imaging Functions and Tools
Top
Main Menu Options
Cut and
Paste Function
The
ability to replicate and move information is the essential power of
the computer. Cutting and pasting is possible between
files made on different pieces of software as well as between documents
made on the same software. The
data structure of the information is not always compatible. Most well developed software applications
have a set of procedures, usually located under Edit in the Main menu,
for converting and opening files produced by different applications.
Scale,
one of the primary clues to depth perception, can be manipulated to
change the context or to create an image that challenges the viewerÕs
assumptions. An entire image or parts of an image can be foreshortened to
simulate perspective or stretched to fit into a defined area.
Size
controls, usually located under Edit in the Main menu, usually refer
to image size or canvas size.
Both make the image larger or smaller when outputted, but altering
the canvas size allows for the creation of blank drawing space (or
crops the image) while altering the image size affects the overall
dimensions of the image.
An
image can also be manipulated through a serious of functions called
Filters usually located in its own Main Menu category. All programs
offer a wide variety of filters built into the program but many third
party filters, known as plug-ins, can be purchased and added to the
default filter list. Common filter effects are pixelate, blur, mosaic, distort,
charcoal, reticulation and many other artistic effects. In the nineteenth
century, photographers turned to the aesthetic strategies of painting
for guidance. Today,
software manufacturers have done the same, producing effects packages
that transform digitized images into simulated paintings. As imagemakers continue to discover an original digital aesthetic,
there will be less of a reliance on older mediums and filters that
simulate them, allowing an authentic digital syntax to emerge and
grow.
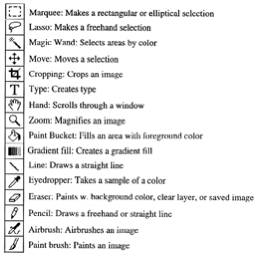
Common Toolbar Icons for Additional Photo-editing
Many of the common editing tools began in Photoshopª and have since migrated to other programs. The various tools are located in a floating toolbar that defaults to the right or left side of your screen. The tools described here only represent the most universal and common. Please refer to the manufacturers manual or the applicationÕs Help Menu for complete and detailed descriptions of all tools. Many of the visible tools on the toolbar have hidden options that are revealed by simply using Click-Hold or Option-click the visible icon, depending on program. Also, each tool has editable options that are usually displayed in an Options Bar underneath the top Main Menu on the screen when tool it is active. The Options Bar is a convenient way to change many options related to the active tool such as: brush size, type of gradient, font size, transparency and colors.
Changing Mouse Pointer
When tools are selected, the mouse pointer matches the tool icon. Many of the drawing and painting tools are circles, which represent the selected width. Each cursor has a hot spot where the effect begins, for example: the tail of the lasso's loop for the Lasso tool is where the selection begins.
Option/Shift/Command
keys
Knowing when to the use the option, shift or command keys in conjunction with the active tool will be necessary to use many of the tools and their functions. For example: using the Option key with the Zoom tool changes the mouse pointer to a plus or minus allowing one to Zoom in or Zoom out of the image on screen. Also, using the shift key with the Magic Wand allows you to add to your previous selection allowing one to group many selections.
Bit Color
2bit
= black & white
4bit
= 16 color
8bit
= 256 color
16bit
= 32,0000 colors
32bit
= millions of colors (16.8 million)
64bit
= billions of color (4.2 billion)